Home » A Step-by-Step Guide to KMA1265 Case idler Assembly
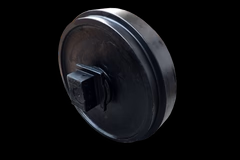
A Step-by-Step Guide to KMA1265 Case Idler Assembly
The KMA1265 Case idler assembly is crucial for the effective operation of heavy machinery. Proper installation and maintenance ensure optimal performance and extend the lifespan of your equipment. This guide will walk you through the step-by-step process of assembling and installing the KMA1265 idler assembly.
Step 1: Gather Necessary Tools and Materials
Before starting, ensure you have the following tools and materials ready:
Tools:
Socket wrench set
Torque wrench
Screwdrivers (flat and Phillips)
Pry bar
Grease gun
Cleaning rags
Materials:
KMA1265 idler assembly
Grease
Replacement seals (if necessary)
Safety gear (gloves, goggles)
Step 2: Safety First
Turn Off Equipment: Ensure that the machinery is turned off and the key is removed.
Secure the Area: Clear the work area of any obstacles and ensure it is safe to work.
Step 3: Remove the Old Idler Assembly
Disconnect Power: Make sure the equipment is powered down.
Support the Machine: Use jack stands to secure the machinery and prevent it from moving.
Remove Track: Detach the track from the old idler assembly. Use a pry bar if necessary to separate the track from the idler.
Unbolt Idler Assembly: Remove the bolts securing the old idler assembly to the frame of the machine. Keep these bolts for reuse unless they are damaged.
Take Out Old Idler: Carefully remove the old idler assembly from its position.
Step 4: Prepare for Installation
Inspect Mounting Area: Clean the mounting area on the machine frame to remove dirt, debris, and old grease.
Check New Idler Assembly: Inspect the new KMA1265 idler assembly for any damage and ensure that all necessary components are included.
Step 5: Install the New Idler Assembly
Position the New Idler: Align the new KMA1265 idler assembly with the mounting holes on the machine frame.
Insert Bolts: Hand-tighten the bolts into place to secure the idler assembly temporarily.
Torque Bolts: Use a torque wrench to tighten the bolts to the manufacturer’s specifications, ensuring they are secure.
Step 6: Reattach the Track
Align Track: Carefully position the track over the new idler assembly.
Secure Track: Use the appropriate method to reattach the track, ensuring it is seated correctly on the idler.
Step 7: Lubricate the Idler Assembly
Use a Grease Gun: Inject grease into all grease fittings on the idler assembly to ensure proper lubrication.
Check for Leaks: After lubrication, inspect for any leaks around seals and fittings.
Step 8: Final Checks
Inspect Alignment: Make sure the idler assembly and track are correctly aligned.
Test Movement: Manually rotate the track to ensure it moves freely without obstruction.
Check Tension: Adjust the track tension as per the manufacturer’s recommendations.
Step 9: Start the Equipment
Turn On the Machinery: Start the equipment and observe the operation of the new idler assembly.
Listen for Sounds: Pay attention to any unusual noises during operation which may indicate issues.
Step 10: Document the Installation
Record Details: Note the date of installation and any observations during the process.
Schedule Next Maintenance: Set a reminder for the next inspection and lubrication.
Conclusion
Following this step-by-step guide will help you successfully assemble and install the KMA1265 Case idler assembly. Regular maintenance and inspections will ensure the longevity and performance of your machinery. If you have any further questions or need assistance, feel free to reach out!
Supporting the Increase in Online Grocery Pickup As the impact of the COVID-19 pandemic continues to be felt, consumers continue to turn to online grocery pickup – opting to buy online and pick up in store to avoid exposing themselves to interaction and potential infection.While the trend has slowed down some as reopening commences, there’s…
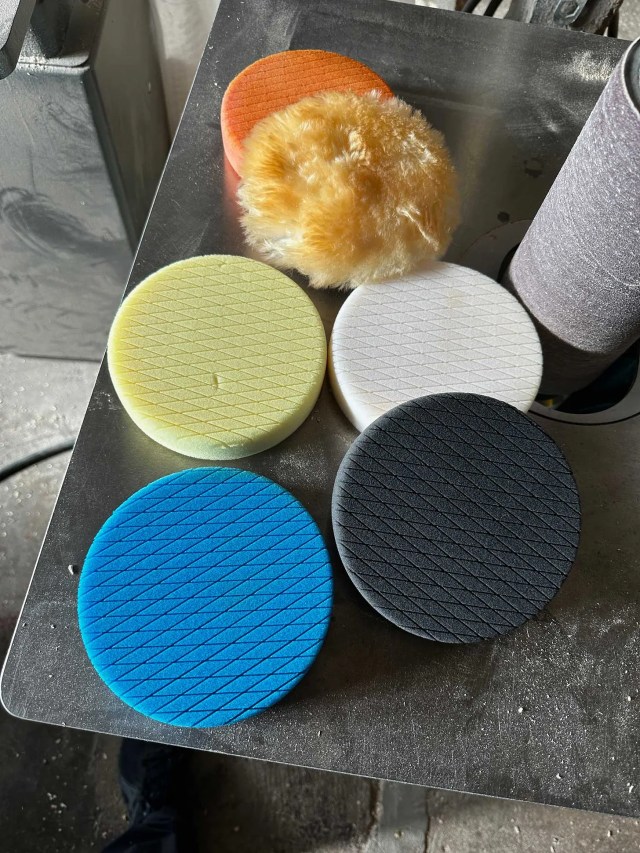
This is the final installment of the Anarchist’s Gift Guide 2023 – tomorrow, it’s back to our regular programming. Buffing Kit for WaxFrom the automotive world comes this incredibly useful buffing kit. I put the pads on my random-orbit sander to buff out wax on tabletops and the like, and the pads makes life so…
Cryogenic Products and Systems: R&D Testing and Repair Posted by Sean Andersen on May 2, 2018 3:10:07 PM Tweet The Dixon Innovation Center in Chestertown, MD is one of the few places in the world where research on products and systems for cryogenic service is happening. A specially designed cryogenic workstation at the Center allows…
A hacksaw is a versatile hand tool commonly used for cutting various materials like metal, plastic, and wood. Known for its fine-toothed blade, the hacksaw is a staple in workshops, construction sites, and DIY projects. Its ergonomic design allows for precise and controlled cutting, making it an essential tool for both professionals and hobbyists. In this article, we will explore the features, benefits, and proper usage of a hacksaw. We will also discuss related materials such as geomembranes and how they fit into the broader context of construction and material handling.
Scissors are a handheld cutting tool consisting of two blades that are joined together at a pivot point. The blades have sharpened edges that meet when the handles are squeezed together, allowing them to cut through various materials. Scissors are commonly used for cutting paper, fabric, thread, string, and other lightweight materials. The two blades…