How to install pocket door pull
How to install pocket door pull
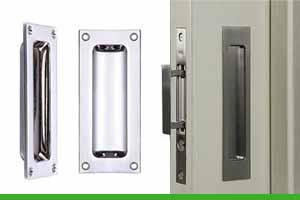
In this guide, you will learn how to install a pocket door pull.
Door pulls are installed on the edge of the door and function with just a touch of the finger to retrieve the door from the compartment and to pull it shut.
Materials needed:
- A pocket door pull (we’d recommend our best-selling 45mm x 102mm Rectangular Flush Pull)
- Clamp
- 2 wood blocks, 3/4-by-3-by-3 inches
- Nailset
- Hammer
- 3/4-inch Forstner drill bit
- Cordless drill
- 3/4-inch chisel
- 3/4-inch brass screws
- Tape measure

Step 1:
Firstly, you will need to pull the door halfway open. With a tape measure, measure up 36 inches from the floor and make a mark on the edge of the door.
Step 2:
Clamp a small block of wood on either side of the door, wedging the side of the door between them. It’s recommended that the blocks are centred on the mark with part of the blocks above and part below where the pull is to be installed. Doing this will stabilise and protect the door veneer from being damaged when you make the cavity.
Step 3:
Place the door pull backwards on the side of the door at the mark. Stencil around the door pull with a pencil where it touches the door. Insert a nailset through any screw holes in the door pull and proceed to tap on it with a hammer; this will create a small divot on the side of the door for each screw.
Step 4:
Insert a ¾ inch Forstner drill bit into your cordless drill. Drill straight into the centre of the pencilled outline on the door, drill to a depth of 1-inch.
Step 5:
Place the back of the door pull into the hole. If it doesn’t fit, use a hammer and a chisel to tap and cut the tracing to re-define the hole so the door pull will fit. Then test the door pull and continue cutting and tapping with the chisel until the door pull fits on the side of the door.
Step 6:
Lastly, remove the clamps and blocks from the door. Place the door pull in the hole, then place the 3/4-inch screws in the holes and secure the door pull to the side of the door by screwing in the screws tightly.
And that’s it; you’re done!

We hope you enjoyed this guide from Ironmongery Experts and have found it useful. If you have an enquiry regarding ironmongery products or have any questions you’d like to ask us, feel free to give our team a call on 01376 557 561. Alternatively, you contact us at info@ironmongeryexperts.co.uk.
Disclaimer
At Ironmongery Experts we strongly advise that you always take safety precautions into consideration when undertaking a DIY project. We also strongly suggest that you closely read and follow the instructions provided by the manufacturer of any building materials, products or tools you use for your projects.
We try our best to provide clear and correct instructions within our articles, so you can easily complete any DIY project you desire. However, please note that the information we provide should only be used as a guideline and that some information within the text may not be entirely accurate.
When using our articles for information and advice, please note that is your own responsibility to determine your capabilities when undertaking and executing the task you wish to complete.
Before starting a DIY task, we strongly recommend that you educate yourself of any existing building, gas, water and electrical works regulations. We believe it is in your best interest to complete further research and/or contact the necessary professional body should you have any further concerns.
We also strongly recommend that a qualified tradesperson completes the relevant safety tests and checks on any DIY you have completed.