Moving With Fish | Relocating an Aquarium | Fantastic Services UK
Relocation is just part of our lives. Job opportunities, better property market, education or love, whatever the reason may be, there will be a couple of moves in your life and it can be stressful. Relocating everything you have and leaving memories behind is not easy.
Some of us may love it, because of the opportunity for a fresh start, others may hate it because of fear of change. Whatever the case is, we get to keep at least some of the memories through our belongings.
One (or a couple of things) we can’t leave behind is our pets. However, having to move house with a pet can make the whole relocation process a little tricky. Today we are going to jump into the deep and talk about the hard work and planning involved with moving a fish tank.
This article is for:
- People that have fish for pets;
- People relocating with their aquariums;
- People that are often moving house with fish.
- How to move a fish tank
- How to move a fish tank short distance
- How to move an aquarium long distances
- Keep an eye on your fish friends after the house move
- Takeaways
How to move a fish tank
So how to transport a fish tank from one property to another? Depending on the distance of your move, the answer to this question will vary. We will concentrate on the most important steps involved in transporting fish and talk about the most common scenarios, our clients find themselves in.
Essentials you need to move a fish tank and transport multiple fish:
- Clean plastic buckets or other suitable transport containers
- Plastic bags
- Siphon hose
- Fishnet
- Ducktape
- Masking tape
- Sharpie
- Bubble wrap
- Blanket
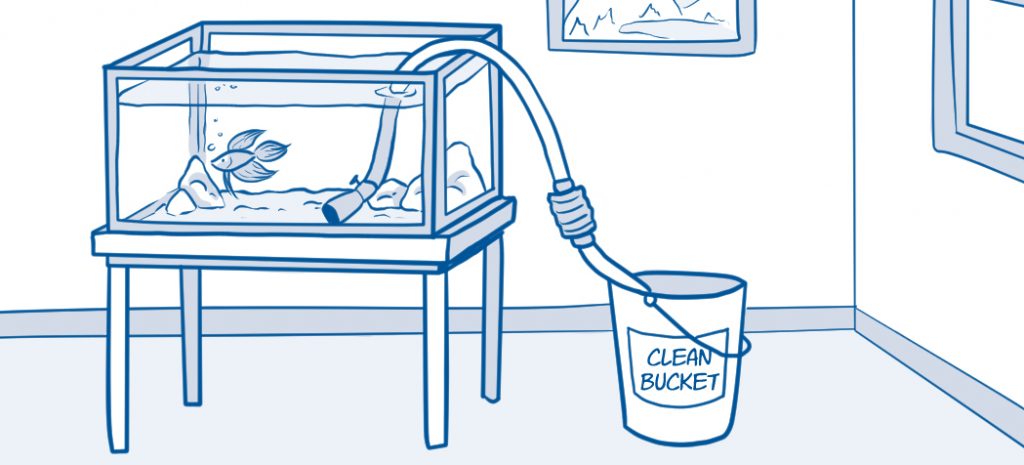
Drain the fish tank
The best way you can do that is with a siphon hose and the help of gravity. All you need is the initial force to start the draining process. You can use a siphon hose with a pump, like the one in the picture, but if you don’t have one at the moment, just suck on the other end of the hose until the water starts flowing. Let it fall freely in the bucket. Pay attention to the water flowing through the hose, you don’t want fish water in your mouth.
There is a third option. Push the siphon end from the top surface of the water all the way to the bottom. The force from your push may be enough to start the flow of water through the hose, but this method is not so consistent, especially for smaller aquariums and it will not work with a regular hose.
You will want to keep approximately 80% of that water for your fish later when setting up the fish tank at your new property. By using the old water, you will save most of the ecosystem, established in the aquarium, and will prevent the shock that your fish may fall into if you throw them in an entirely new environment/water. Use the prepared buckets to save the water.
Remember to use well-cleaned buckets. Traces of different chemicals may destroy the microflora and beneficial bacteria in the aquarium, or even harm your fish. Preferably, the buckets will have lids that could be sealed off to prevent splashes.
Now that your aquarium is half empty, catch your fish with the fishnet and drop them into the bucket in which you just drained the tank water. Finish emptying the tank.
Pack the aquarium
Fish tanks are very fragile. You have to carefully protect the edges and surface walls. We recommend letting the aquarium rest on a thick piece of cardboard, a bit wider and longer than the fish tank itself. Fold the edges upwards and duct tape them in place.
Now grab your bubble wrap and carefully wrap the aquarium all around. Leave the opening uncovered. You can use strips of duct tape to keep your bubble wrap secured in place. Fill the inside of the aquarium with more bubble wrap and crumpled sheets of paper. Finally, put the lid on, if your aquarium has one.
After your fish tank is well wrapped, place it in a box and fill any gaps with more bubble wrap and sheets of paper. A lot of packing materials will be used in this process, but it is necessary. Even if you tap your aquarium in a corner somewhere and there is no visible damage, there might be a broken seal. This is why protecting the corners is so important.
Once all of this is done, you are ready to transport your fish tank.
Moving your fish tank is almost like a second move. It requires a lot of work and attention. It is best to do it once all of your belongings have already been relocated by the removal team. It is important to remember that they won’t take anything living in their cargo. You can pack and send the aquarium itself, but you will still have to transport the fish on your own.
For everything else
Fantastic Services can transport your every other belonging except pets. If your aquarium is well packed or prepared for the move by our professional packers, we can easily transport it with the rest of your belongings.
Pack the aquarium landscape decorations
If you have sand on the bottom of your fish tank you can just put it in one of the buckets with water. Avoid using those with fish in them, so you don’t stress the animals.
Rocks, caves and other heavy aquarium landscapes could be transported in those same buckets, as long as there are no fish inside. Otherwise, you risk for a rock to squish one of your fish while you are breaking or taking a sharp turn. If you don’t have enough space to fit the landscape elements in the buckets, wet some towels with water from the aquarium and wrap the decorations in them. This will keep any microorganisms that may live on them alive until you can re-assemble your fish tank.
Corals should be kept in buckets with water from the fish tank. Other decorative vegetation may be kept in the buckets, or wrapped in wet towels, however it might be best to consult with a local expert, because some plants may need special care before or after they are relocated.
And last, but not least!
Transport the fish and the aquarium safely
We have already established that moving fish in buckets is probably the best way. You can attach battery-operated heaters and oxygen pumps if needed. You can’t do this with plastic fish bags. Besides, they are usually hard to find, as most pet stores don’t keep them in stock. Not to mention, they could easily be punctured while moving, in which case you can lose a member of the aquarium.
Remember to wash the buckets well, because there might be traces of chemicals used in the manufacturing process. Rince the buckets and dry them out before putting your fish inside. Avoid using detergents that foam up. It will be harder for you to rinse those and they could be harmful to your fish. You can use alcohol-based detergents, just leave them out in the open to let the alcohol evaporate before transporting fish in them.
It’s best to transport both fish and the aquarium with a personal vehicle to cut on time and have more control over the removal process. Make sure the well-packed aquarium is well secured when you load it into the vehicle. As for the fish, if you have gone with the bucket method simply put to use those advanced Tetris skills and arrange all buckets in a way that will minimise or ideally prevent any movement during transportation.

See how can you benefit from a Fantastic professional removals service.
Set up the fish tank and place the fish back inside
Setting up the aquarium is a priority in the moving process. Ideally, you would have already picked out the spot at your new property where the fish tank will be placed.
Carefully unpack the fish tank, you don’t want to mess up at the very end. Thoroughly examine to make sure it didn’t get damaged during transportation. From there you want to proceed and start arranging the home of your fish friends. Start placing the sand, pebbles, any decorations, plants, fish tank equipment, etc. You want to follow with the fish tank water from buckets where there are no fish.
Once you have that out of the way you can continue to introduce your fish friends back to their home. Gently catch them with the fish net and place them in the aquarium. Use the remaining water from the buckets to fill in the fish tank as much as possible. If you need to add water to reach the optimal water level either obtain it from a trusted provider or take the necessary steps to prepare water to be added to the already existing environment of your aquarium. After a couple of hours turn on the heaters and pumps.

How to move a fish tank a short distance
When talking about short-distance moves we mostly refer to house moves that are two-three blocks away from address to address. So if you are just relocating to another property in the same neighbourhood these steps can help you have a smooth move of your aquarium:
- Step 1: Turn off and remove filters and all the equipment.
- Step 2: Remove any heavy landscape decorations from the aquarium. This will help avoid injuring your cherished fishies and/or damaging the fish tank itself.
- Step 3: Carefully place the aquarium in your vehicle. Do your best to safely strap the aquarium with the seat belt to reduce any possible movement.
- Step 4: The most important and crucial step is to drive to your new address. You will want to go slowly and avoid any sudden turns.
- Step 5: Unstrap and safely place the fish tank and your fish friends in your new home. Place all filters and heaters back inside and plug them in.
Admittedly, it is not the best approach especially if we’re talking about a huge aquarium. However, if you are moving fish to a new house 15 minutes away and working with a small fish tank, it is an option. It will save a lot of moving the fish from the aquarium to other containers, then back to the aquarium, etc.
Here are a couple of tips to make this as safe as possible:
- Let the water reach optimal temperature;
- Remove heavy landscape decorations;
- Drain half of the tank water into a bucket to reduce the weight;
- Put a lid over your aquarium;
- Take a cab or better yet, ask a friend to drive you;
- Regulate the temperature in the vehicle if you can;
- Wrap the aquarium in a blanket to protect it from incidental bumps here and there;
- Keep the fish tank in your lap if possible. Or sit next to it in the back and keep it steady, if it’s a big one.
Water heaters and oxygen pumps should be disconnected from the sockets and left to cool down. This is the perfect time to clean the tubing from any algae and other build-ups. Afterwards, use the masking tape and your sharpie to label each cable, as well as the tubing. This will make your job easier when setting up the tank at your new place.
So far so good, but for a longer move, you will have to take a couple of extra steps.
How to move an aquarium long distances
To properly move a fish tank safely and minimise the stress for your fish you will need to spend some time preparing before the big day. As soon as you have access to your new property or on the day of your move you will need to spend time packing up your precious fish friends and their home and settling them at their new spot at the property. Here is what you will need to do:
- Step 1: Drain the fish tank
- Step 2: Pack the aquarium
- Step 3: Pack the fish tank decorations
- Step 4: Transport the aquarium and fish
- Step 5: Set up the fish tank and place the fish back inside
Moving with fish long distance doesn’t sound too complicated now, does it? Especially when you have all steps on how to pack the aquarium and prepare the fish for moving explained in detail.
Need a hand transporting your aquarium?
Count on us for a short- or long-distance moves!

Keep an eye on your fish friends after the house move
Once your fish are back in their aquarium after the house move it is important to monitor them for the first few weeks. The change can lead to your beloved companions becoming stressed or unsettled. This is completely normal and it is expected for the fishies to take a few weeks to fully adjust.
In order to minimize the amount of regurgitation caused by stress, only feed them every other day for the first two weeks. In case of a concern, you can reach out to many experts and online forums.
Takeaways
- Save as much of the water from the fish tank as you can, and if you’re not able to, make sure you buy water from a merchant that you trust. You can always make your own if you have the needed equipment.
- Pack your fish tank well for the move. You can send it with the rest of your belongings.
- Removals specialists can provide you with packing materials or pack your fragile aquarium professionally.
- Don’t leave rocks and other landscape elements in one container with the fish while transporting them.
- Give water heaters time to cool off before the move.
- Pack fresh filters to install at your new place.
***
Do you have any tips that you could share from your experience? Please, use the comment section below to do so. We may include them in the article if you want us to, and we find them useful.
Image source: depositphotos / mikdam